I’ve seen a lot of VR 360° videos cropping up on YouTube lately. The majority of these videos are captured using special 360° camera equipment. My fascination with Blender 3D software got me wondering if it was possible to render out a 3D scene as a 360° video to create something of a VR experience. Using a combination of Blender, Photoshop, and Premiere Pro, I delved into the process of transforming 3D-modeled scenes into immersive 360° videos… Well, sort of.
The First Attempt
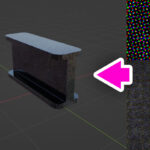
I didn’t want to sink too much time into modelling a beautiful scene with my first test. In my initial foray, I crafted a rudimentary 3D scene featuring simple animations. I only made a single cube rotate erratically (just to make sure the animation was being captured properly). The objective was to grasp the fundamentals of the process before delving into more intricate details. Blender, a powerful open-source 3D creation suite, served as the primary tool for modeling and animation. The challenge lay in adapting the scene to the unique requirements of VR 360° video, ensuring a seamless and immersive experience for the viewer.
Rendering the scene involved a specific camera and render output setup. To make the 360° format work, I had to use the following setup prior to video rendering.
- Change the render engine to Cycles.
- Change the scene’s camera type to be panoramic (equilateral).
- Change the output dimensions to YouTube’s recommended VR 360° video dimensions of 8192 x 4096 px (alternatively, any 2:1 video ratio will work).
- Position the camera to the desired starting view.
Of course, Blender output the video render as a series of .png images. I utilized Premiere Pro to stitch together the frames and generate the immersive 360° video, making sure that Premiere’s output settings had the VR option checked off. Doing this added the proper metadata needed for YouTube to recognize the 360° video format. I also decided to export as an H.264 MP4.
Advancing the Experiment
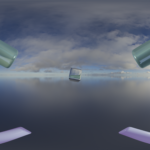
Encouraged by the success of my initial attempt, I proceeded to create a more detailed scene, paying particular attention to materials, lighting, and reflections to see how they behaved in the final video. Blender’s robust material editor allowed me to experiment with textures, adding depth and realism to the virtual environment. This step was crucial in enhancing the overall visual appeal of the 360° video.
Chromatic Aberration Effect
To inject a touch of uniqueness into the scene, I decided to experiment with post-processing effects. Using Photoshop, I introduced a not-so-subtle chromatic aberration effect. I wanted to see how any degree of post-processing would come across in the final video. In the end, I think that post-processing in this way looks much too static. It would have been better if the effect was implemented within Blender such that the camera angle shifted the chromatic aberration rather than it appearing painted on.
Conclusion
Experimenting with VR 360° video rendering through Blender, Photoshop, and Premiere Pro has been an educational journey. I believe I can put this process to great use in the future by investing more time into animation, audio, and performing effects within Blender. I can see this being useful for creating VR 360° music videos, or animation timed to audio. The render times are very long with projects like this though, so I’ll see what my computer can handle.